A Postman Collection allow you to group together several APIs that might be related or perhaps should be executed in a certain sequence. You can organize these requests in folders as well. Basically collections server 4 purposes: Organization of tests, Documentation, Test Suit creation, and designing conditional workflows.
How to create collection
Collections can be created by following two processes. One, while saving any request it shows option to create collection and/or folders. As per need one can created and organization those.
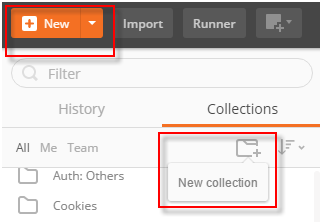
Another way to create collection by using sidebar New Collection button or New Button at toolbar.
While creating the collection it shows option to select authorization type, any pre-request script, any variable or any test script.
Features of Collection
Postman allows drag and drop feature to reorder and organize requests and folders. By using sub folders levels can be created and description can be added while will reflect creating documentation. Sample responses also can be added at collection level. You can read more about these on Postman site.
One more important feature I’ll discuss in detail is adding Authorization and scripts. In our previous article we talked about authorization. Suppose you added a folder to collection and under the Authorization tab, the default authorization type is set to “Inherit auth from parent”.
The “Inherit auth from parent” setting indicates that every request in this folder by default uses the authorization type from the parent. In case, the collection is using “No Auth”, so the folder uses “No Auth”, meaning all requests in that folder will use “No Auth”.
If you have a group of requests that all require the same authorization, you can define the authorization for all requests in a collection or folder or simply for every request individually. If you create a new collection or folder, every subsequent request in the parent element inherits the authorization definition, unless the user explicitly selects another type.
Another great usage of collection is building workflows. By using setNextRequest() function and other js coding features in test script or pre-request test script we can build the workflow and skip unexpected request on the basis of need/responses.
Sharing collection
Sharing of collection is only supported in pro version. For free version, collections can be exported and shared in file form which will contain the json defining all required options. Same can be imported at destination without any loss.
Collection json file will not have any attached environment so one need to export the environment separately and share.
Using Postman Runner
Collections can be run within the Postman app using the collection runner, from the command line using Postman’s Runner option or Newman tool, or on scheduled intervals using Postman Monitors.
Running a collection is useful when you want to automate API testing. When you run a collection, you’re essentially sending all requests in your collection one after another. There are several parameters that you can configure for a collection run. Like, use building workflow options, using environment, different types of variables, test script, delay, log responses, Iterations and data files.
Let’s talk more about Data files and Iterations.
Working with data files
Data files are necessary component if we talk about test automation or using variables data or execution in iterations. Let’s go through the example given at Postman site:

To try this, just create a post request with two variables: path and value. We will be passing the value of these variables from data files. First let’s use a most commonly used format .csv file.
Copy below text and save a .csv:
path, value

post, 1

post, 2

post, 3

post, 4
Here very first line has list of variable names and other following lines have data corresponding to the variables mentioned in first row.
Now let’s try to execute it. Use Menu Collection –> Runner to start the runner tool. Else you can use Runner button in toolbar as well. It will open a tool which will be used to run the collection.
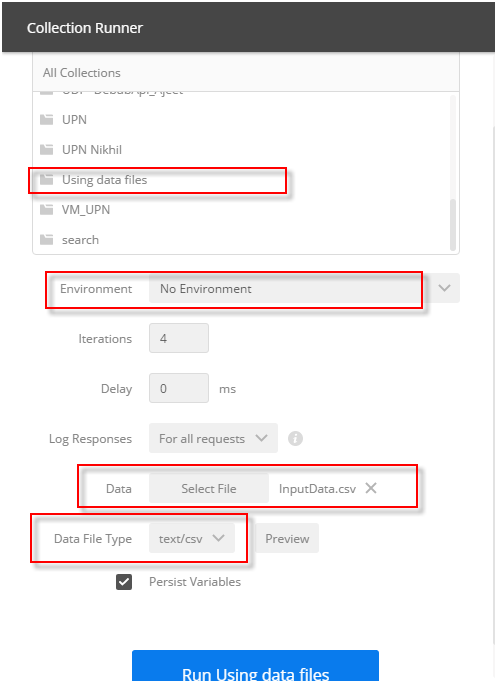
Here you can select the collection needs to be executed. Choose environment and data file. Also choose required file type. Just hit the Run using data files button. It will start the execution.
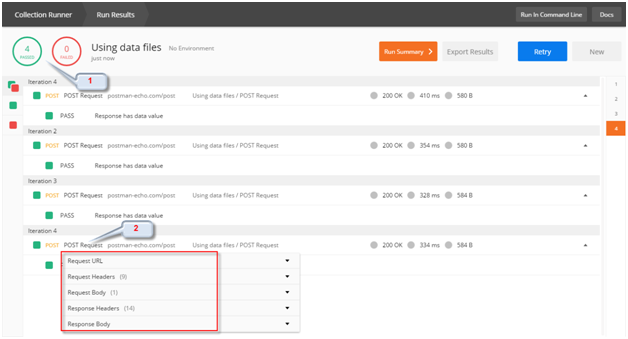
Once run completes you will see about window with result summary. #1 shows the test executed and number of test case passed or failed. #2 is a hyperlink by clicking you can get menu which can help you to see the request/response.
Postman supports JSON file format as datafile as well. Copy below text and save a .json and select Data File Type as application/json. Try same as .csv in above example.
[{
  "path": "post",
  "value": "1"
}, {
  "path": "post",
  "value": "2"
}, {
  "path": "post",
  "value": "3"
}, {
  "path": "post",
  "value": "4"
}]
Next topic will be on running the test using Newman so keep following us.