I am here again with a new article. In this Article I am going to talk about the deployment of websites on Azure. There are lots of article available regarding this topic. I am trying to document all the different ways of the deployment of website in this Article. You will be able to see the different techniques of the deployment of website in single article. I hope it will be helpful for Azure Developers.
There are various ways to deploy website on Azure WebApp. Some of the common techniques are as follows:
- Deployment using GIT.
- Visual Studio publish method.
- Deployment Using FTP.
- Powershell command to deploy website.
Deployment Using GIT
Prerequisite:
- Azure subscription.
- Create webapp using portal.azure.com. Appservice tab provides webapp option to create webstie.
Steps:
The following steps are required to deploy website using GIT:
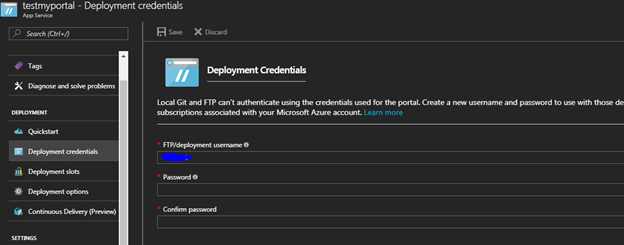
Step-1: Select the created webapp in Azure. One of the tab “Deployment Credential” is available using which we can set the deployment credential for FTP and GIT. Provide UserName and Password.

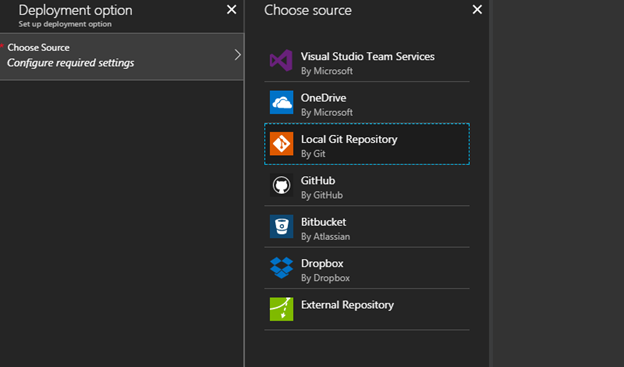
Step-2: Set the “Deployment Option” to configure GIT as source.
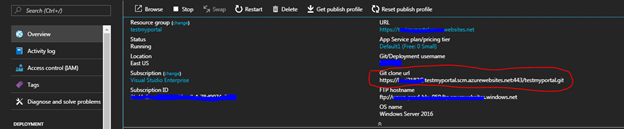
Step-3: After completing the above step we can see the GIT Clone URL on webapp dashboard. This URL is used to push code on GIT from local system.
Step-4: We can use the following command in GIT bash to clone repository on local system using GIT clone URL.
git clone <<URL>>
Step-5: A folder will be created in local system drive. Create webapplication in this folder using visual studio. We can also copy the code of existing application in this folder.
Step-6: Use the following command in GIT to push the code from local system to the remote GIT repository.
git add .
git commit –m “message”
git push origin master.
All the steps are completed now. We can test the website using the provided URL in browser.
Deployment Using FTP
Prerequisite:
- Azure subscription.
- FTP Client.
- Create webapp using portal.azure.com. Appservice tab provides webapp option to create webstie.
Steps:
Step-1: Select the created webapp. One of the tab “Deployment Credential” is available using which we can set the deployment credential for FTP and GIT. Provide UserName and Password.
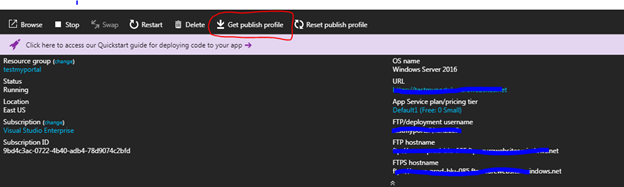
Step-2: We can get FTP Host URL from the dashboard page of the created website.

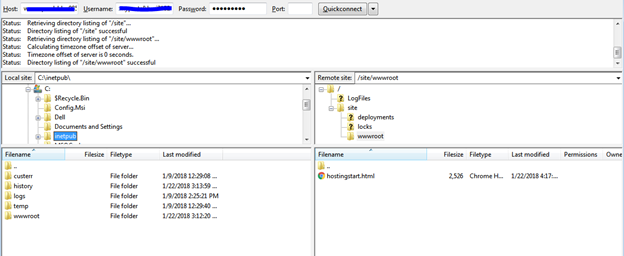
Step-3: Open FTP Client and provide the information FTP URL and user name and password to connect to the file system of created website. Now copy the website.
Deployment Using Visual Studio
Prerequisite:
- Azure subscription.
- Visual Studio Application.
- Create webapp using portal.azure.com. Appservice tab provides webApp option to create webstie.
Steps:
The following steps are required to deploy website using GIT.
Step-1: Create web application using visual studio application. We can also open existing application in visual studio for deployment.
Step-2: Down the publish profile from the dashboard page of the created webapp using portal.azure.com.
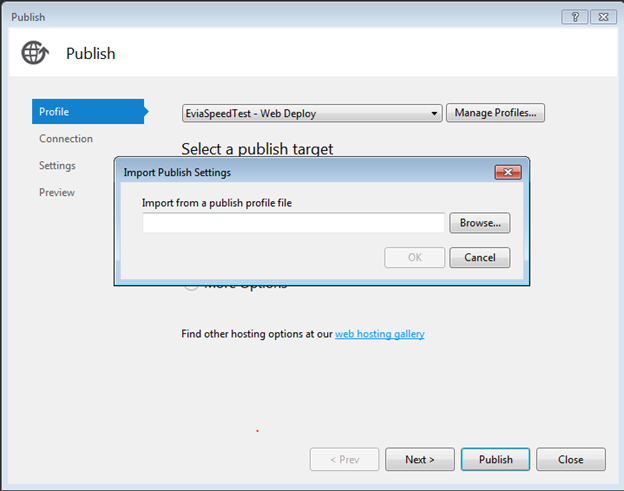
Step-3: Right click on the website and click on the publish option. The following diaglog box will appear:

Step-4 Click on import option in dialog box. Select the publish file from the local systems.
Step-5: Click on the publish button to deploy the website.
Deployment Using Powershell command
Prerequisite:
- Azure subscription.
- PowerShell.
Steps:
Step-1: Use the following PowerShell command to create the new website.
New-AzureRmWebApp -location “East US” -name “portalname”
Step-2: Create a new application or open an existing application in Visual studio 2015.
Step-3: Create the package of the application using “MSBuild” command using command prompt.
C:WindowsMicrosoft.NETFrameworkv4.0.30319>MSBuild “D:TestDeployApp.csproj” /T:Package /P:Configuration=Debug;PackageLocation=”D:Package.zip”
Step-4: Now we can deploy the application package on the target website on azure using powershell command.
Publish-AzureWebsiteProject -Name testmyportal -Package “D:package.zip”
Possible issues:
It may possible the above command of powershell throws error
“Publish-AzureWebsiteProject : The application pool that you are trying to use has the ‘managedRuntimeVersion’ property set to ‘v4.0’. This application requires ‘v4.5’.”
Solution:
We can fix this issue by adding the following tags in the .csproj file.
<IgnoreDeployManagedRuntimeVersion>True</IgnoreDeployManagedRuntimeVersion>
The .csproj file of the project can be edited using notepad or any text editor.
For more detail please click on the link below:
Thanks Krishna, its helpful.