These days all new web applications are being developed using service based architecture. There are many tools for API testing like SOAP UI, Parasoft SOAtest and Postman. Postman is available as a native app for Mac, Windows, and Linux operating systems.

In this tutorial, we’re going to walk through the different features that Postman provides and how we can organize them to make our API testing less painful.
In comparison of other tools in the market, it is very lightweight and fast. Requests can be organised in groups, also tests can be created with verifications for certain conditions on the response. With its features it is very good and convenient API tool. It is possible to make different kinds of HTTP requests – GET, POST, PUT, PATCH and DELETE. It is possible to add headers in the requests.
Installation
To install Postman, go to the apps page and click Download for Mac / Windows / Linux depending on your platform. It’s recommended to use native app but postman is also available as Google chrome App.
Mac OS installation
Once you’ve downloaded app, you can drag the file to the “Applications” folder. Double click on Postman to open the application.
Windows installation
- Download the setup file
- Run the installer
Linux installation
Installation on Linux can vary between distributions. Check out this guide for installing the Postman app on Ubuntu 16.04
Making Request
Once you will open the postman it check left pane having two tabs, History and Collections. History tab is show history of all requests you make during testing while collections tab shows the collection.
Postman comes with preinstalled collection “Postman Echo”. It has some basic test cases. In this tutorial we discuss these examples.
To make first API request using postman, enter http://postman-echo.com/get in URL field and hit send button you will see the server response at the bottom with some JSON data. Notice that Postman has added postman-echo.com/get under the History tab of the sidebar.
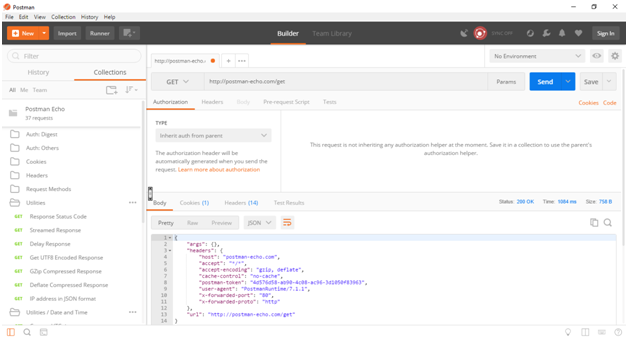
http://postman-echo.com is a sample API that Postman hosts for you to experiment with various types of requests. It returns the data that you send in the request as part of its response.
Refer to documentation for this sample API.
Referring the screenshot above we can see that the view incorporates different elements. The top bar contains the request method (in this case GET), and right next to it we specify the endpoint to make the request to. If the request has some parameters we can specify them by clicking the Params button, which will open a table for entering them. We also get option for bulk edit. When ready, we can click the send button to initiate the request.
The next section contains five tabs:
Authorization: Specifies how to authorize the request. Like Bearer Token, Basic Auth, OAuth2, etc.
Headers: Any header that should be sent with the request. Like content-type, Authorization etc.
Body: Request body for request types like Post, PUT, etc.
Pre-request Script: JavaScript code to be executed before performing the request. (We will discuss details about this later)
Tests: JavaScript code to validate the response payload.
The bottom section contains all the details about the response (status, time and size). The four tabs are self explanatory, except for Tests which contains the tests result if we have any (We will discuss details about this later).
Troubleshooting API requests
Sometimes due to some issue we don’t get expected results. Lets discuss what are common issues we can face and how troubleshoot those.
If you’re not getting any response, Postman will display a message that there was an error connecting to the server.
Connectivity issues:
The easiest way to check connectivity issues is to open your server address in a browser, such as Chrome or Firefox. If opening it in the browser works, then the possible causes could be:
Firewall issues
Some firewalls may be configured to block non-browser connections, in this case, you should talk to your network administrators in order for Postman to work.
Proxy Configuration
If you are using a proxy server to make requests, make sure you configure it correctly. By default, Postman uses the proxy settings configured in your Operating System’s network settings. Postman Console will provide debug information about the proxy server.
SSL Certificate issues
When using HTTPS connections, Postman may show the error above. In this case, you can try turning off SSL verification in the Postman Settings. If that does not help, your server might be using a client-side SSL connection. This too can be configured in Postman Settings. Use the Postman Console to ensure that the correct SSL certificate is being sent to the server.
Client Certificate issues
Client certificates may be required for this server. Fix this by adding a client certificate in the Postman Settings.
Incorrect Request URLs
If you use variables in your request, make sure they are defined in your environment or global. Unresolved request variables may result in invalid server addresses.
Using incorrect protocol
Check whether you’re accidentally using “https://” instead of “http://” in your URL (or vice versa).
Very short timeouts
If you configure a very short timeout in Postman, the request may timeout before completing, resulting in the error block above. Try increasing the timeout to avoid this issue.
Using Console for debugging
Use View –> Show Postman Console menu or use the keyboard shortcut (CMD/CTRL + ALT + C). Similar to DevTools, every call along with its headers and payloads will be logged to the Postman Console.
Use console.log(“message”), console.warn(“message”), console.info(“message”) at appropriate locations in the scripts will help extract the exact line of code that is acting up.
Authorization
Some APIs use authorization before recognizing the request and provide response. Postman support all popular authorization types. By selecting Type dropdown in authorization tab you can see all supported authorization types. It should include
Inherit auth from parent
No Auth
Bearer Token
Basic auth
Digest Auth
OAuth 1.0
OAuth 2.0
Hawk Authentication
AWS Signature
NTLM Authentication [Beta]
We also can use Header for authorization. The header format that Postman will use is:
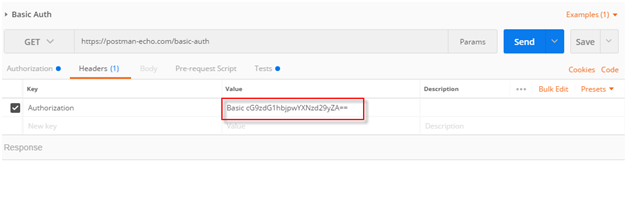
Authorization: Bearer <TOKEN>
Using variables in Postman
Postman allows to use variables. Following scope are available in Postman:
- Global
- Collection
- Environment
- Local
- Data
Scopes can be viewed as different kinds of buckets in which values reside. If a variable is in two different scopes, the scope with a higher priority wins and the variable gets its value from there. Postman resolves scopes using this hierarchy progressing from broad to narrow scope.

Global variables are commonly used to capture ephemeral states.
Collection variables are best for values that are meant to be reused within the current collection.
Environment variables are frequently used across multiple server environments – like development, staging, and production.
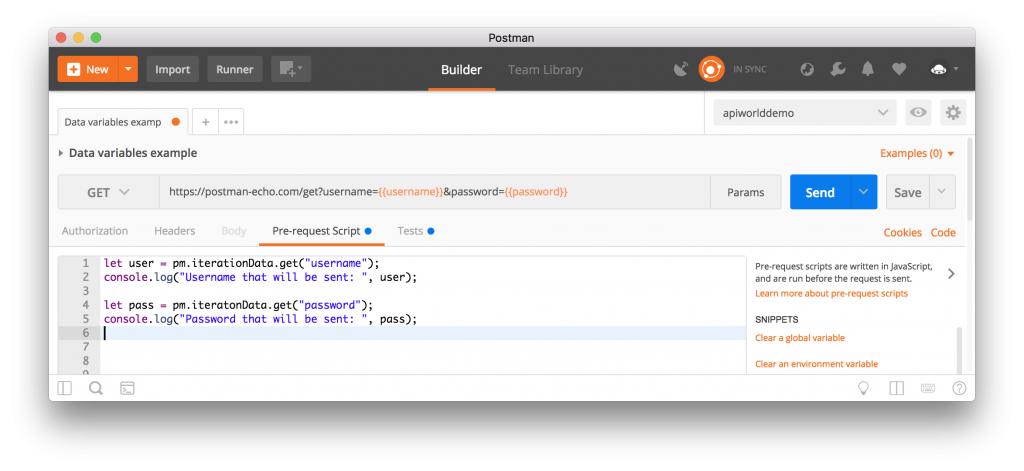
Data variables – data variables are available when using a data file with the collection runner. You can import the data as a CSV or JSON file, and then use the values from the data file inside HTTP requests and scripts. With data variables, you can test multiple instances of a request in one go using something like {{username}} in the request builder or pm.iterationData.get(“username”) in the script sections.
Variable scopes – Similar to working with variables in other programming languages, Postman resolves scopes according to a variable scope hierarchy. Using variables within specific scopes allows you to reuse values efficiently.
In case we have variable with same name in more than one scope then variable from inner most box will take the priority over outer box. i.e. Data variable will take priority over environment variable.
Now questions come what different ways to use variable in Postman.
Use in request builder: In request builder you can use any variable by calling variable names with in two braces. i.e. {{Variable_Name}}
Using variables in scripts: – variables are also available in the pre-request and test script sections. Since these sections are written in JavaScript, you will initialize, retrieve, and define the scope of these variables in a different manner.
Dynamic variables – generate and use dynamic variables in the request builder as unique IDs, timestamps, or random integers. Use dynamic variables with the double curly braces syntax – like {{$timestamp}} – in the request URL / headers / body.
{{$guid}} : Adds a v4 style guid
{{$timestamp}}: Adds the current timestamp
{{$randomInt}}: Adds a random integer between 0 and 1000
So using variables we can update the endpoint like:
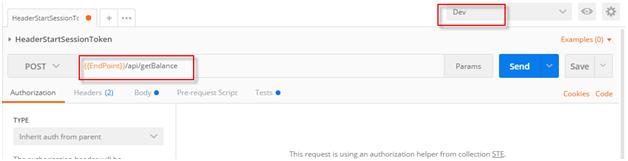
Here I am using environment variable EndPoint and currently selected Dev environment. Same variable can contain different value for QA environment.
Another use of variable is when need to execute multiple services where response one service needs to be passed into next one. One option is to copy the response value and past as input into next server. Another option is to use variable to extract response from one service and call same variable as input in next service calls.
In next article we will be going through steps to create test using java script.
If you have question on how to use timestamp or date in specific format. Visit: http://www.ourhints.com/testing/api-testing/postman/how-to-use-date-and-timestamp-in-postman/